GitHub Copilot Agent Mode: Making It Okay to Be Lazy
It’s a great time to be lazy. GitHub Copilot Agent Mode swoops in to tackle the setup grind, hassle-free.
Who loves setting up a new project environment? Wrestling with dependencies, configuring compilers, and pinning library versions? Definitely not me. I’m all about avoiding that hassle, and just thinking about the setup ‘mess’ has stopped me from starting projects more times than I’d like to admit. Getting your environment right takes precious time; reading documentation, following deployment guides, and troubleshooting. But being lazy isn’t a bad thing! With GitHub Copilot Agent Mode, you’ve got a trusty sidekick to handle the heavy lifting.
A Bit of (Mostly Irrelevant) Background
For most of my adult life, I’ve been immersed in the Microsoft tech stack. Windows is my comfort zone, and Visual Studio is my happy place. I’ve been a .NET developer for over a decade, and before that, I was proudly coding in Visual Basic 6.0 (yes, I’m owning it!). In recent years, with Azure’s rise, I’ve dabbled in the Linux world…. never a pro, but confident enough to get by. When WSL (Windows Subsystem for Linux) came along, I jumped on board fast.
Microsoft loyalist? Pretty much. ![]()
I’m also an amateur photographer and enjoy editing home videos for family and friends. Since I never invested in a high-end desktop with powerful GPUs, my laptops always struggled with video and photo editing. That’s what led me to pick up a Mac Mini M2 a while back. You can’t teach and old dog new tricks, but I am trying to learn a little bit of the macOS world.
After seeing its value for photo and video editing, I decided to experiment with macOS as a development machine. I installed Visual Studio Code and started using it for my development work. I’ve been using it for a while now, and I love it. It’s fast, lightweight, and really similar to what I have been using for many years on my trustoworthy windows machines.
Then came the moment I decided to set up my Jekyll-based blog environment. I glanced at the official Jekyll macOS installation guide, and memories of past troubleshooting nightmares flooded back. Dependencies, Ruby versions, obscure errors… ugh ![]()
![]()
![]() . I closed the terminal and muttered, “I’ll deal with this later.”
. I closed the terminal and muttered, “I’ll deal with this later.” ![]()
But then it hit me: GitHub Copilot Agent Mode had just launched. Why not let it do the heavy lifting for me? ![]()
GitHub Copilot Agent Mode: Making It Okay to Be Lazy
Words alone can’t fully capture the magic of GitHub Copilot Agent Mode. A video might have been ideal, but I’ll do my best with a few paragraphs and screenshots.
First (naive) approach
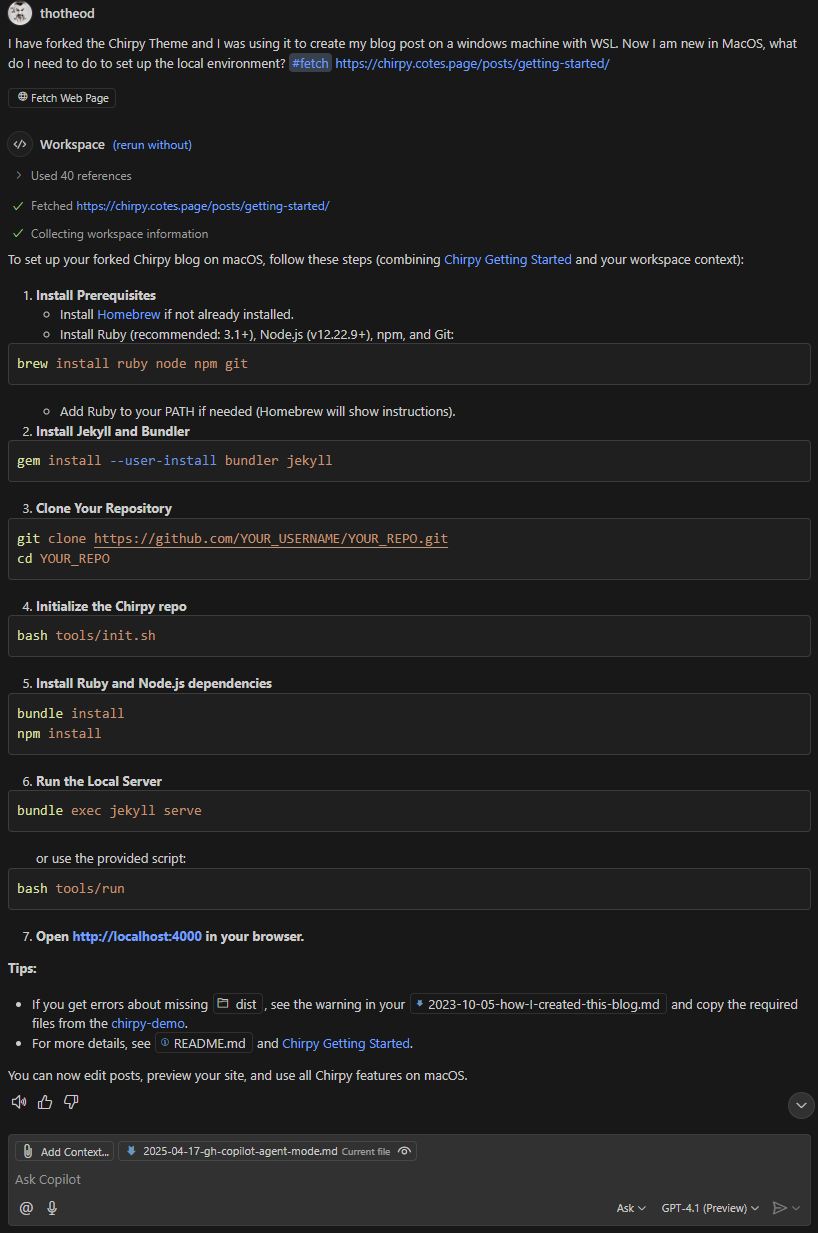
I fired up Visual Studio Code, navigated to my blog repository, and clicked the GitHub Copilot icon in the top bar. Feeling optimistic, I typed a verbose prompt: “I have forked the Chirpy Theme and I was using it to create my blog post on a windows machine with WSL. Now I am new in MacOS, what do I need to do to set up the local environment?”
The result was not promising as you see below. I got a list of steps, but they were not very helpful. I mean, I could have done that myself. I was looking for something more like a script or a command to run, not just a list of steps.

Using the #fetch tool
Then I thought, why not use the #fetch tool? It’s a great way to get more detailed information about the steps you need to take. But where is the documentation, ugh? Why Bing-ing it? Ask copilot!

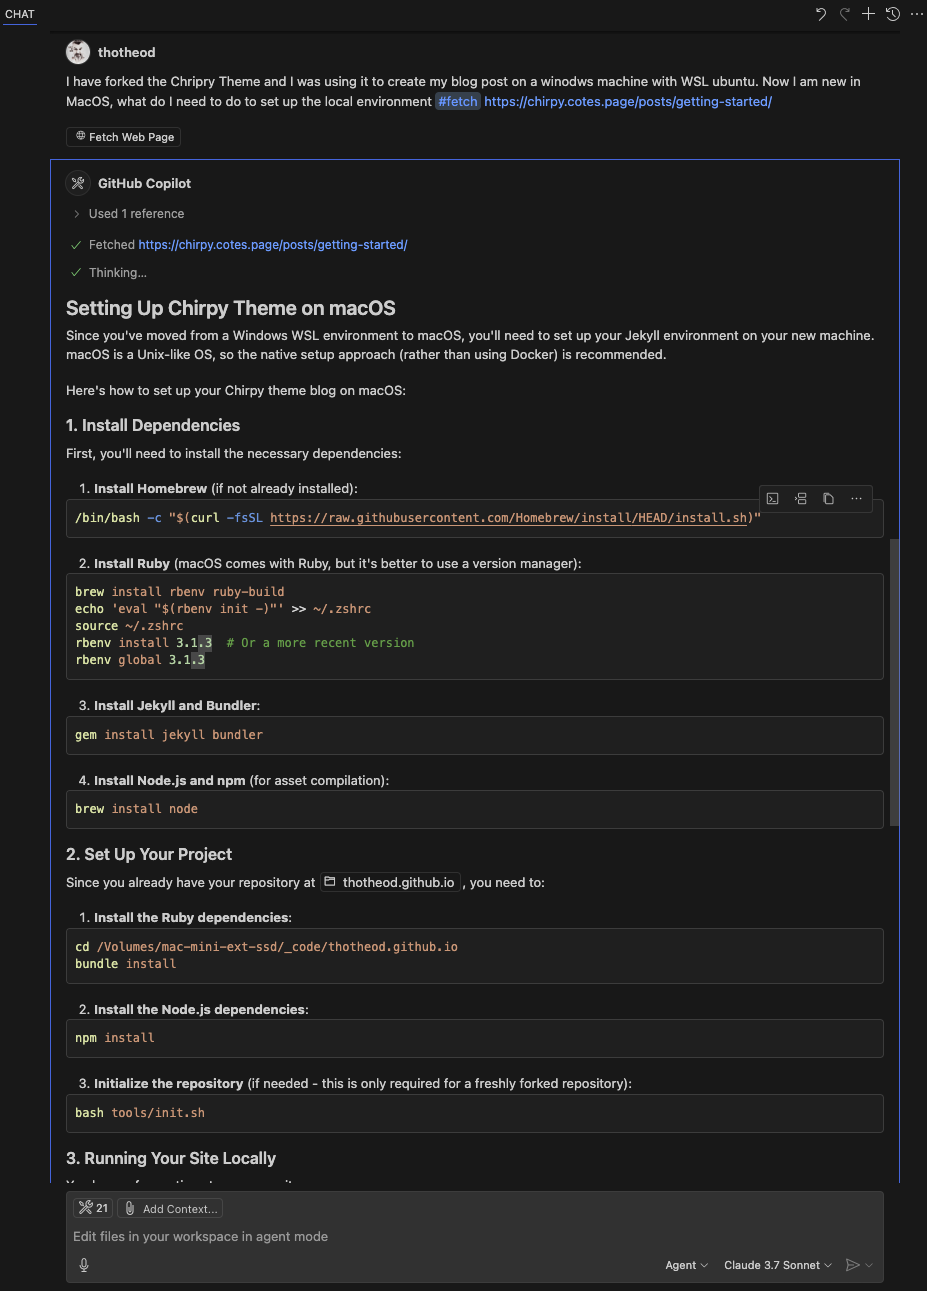
Great, so let me now give it the same prompt together with the #fetch documentation tool. Voiala! I got a much better response. I was impressed! ![]()
I got a list of commands to run, it was exactly what I needed. I just had to copy and paste it into my terminal, and I was good to go…… Or was it? ![]()
Switching to Agent Mode
The #fetch tool gave me a solid list of commands, but copying and pasting still felt like work. If something went wrong, I’d be stuck troubleshooting—hardly the “lazy” dream, right? ![]() I wanted Copilot to do more of the heavy lifting. Enter GitHub Copilot Agent Mode.
I wanted Copilot to do more of the heavy lifting. Enter GitHub Copilot Agent Mode.
I switched to Agent Mode, experimented with different models, and settled on Claude 3.7. Using the same prompt with #fetch tool I was amazed at first by the result. It seems that the steps were more detailed and well thought but still, they were just….. steps I’d have to execute them myself. Really, Copilot? ![]()
![]()
![]()
![]()
But then, as I scrolled down, something caught my eye. Copilot asked for permission to take command. My jaw dropped. “This is next-level!” I thought ![]()
![]()
![]()
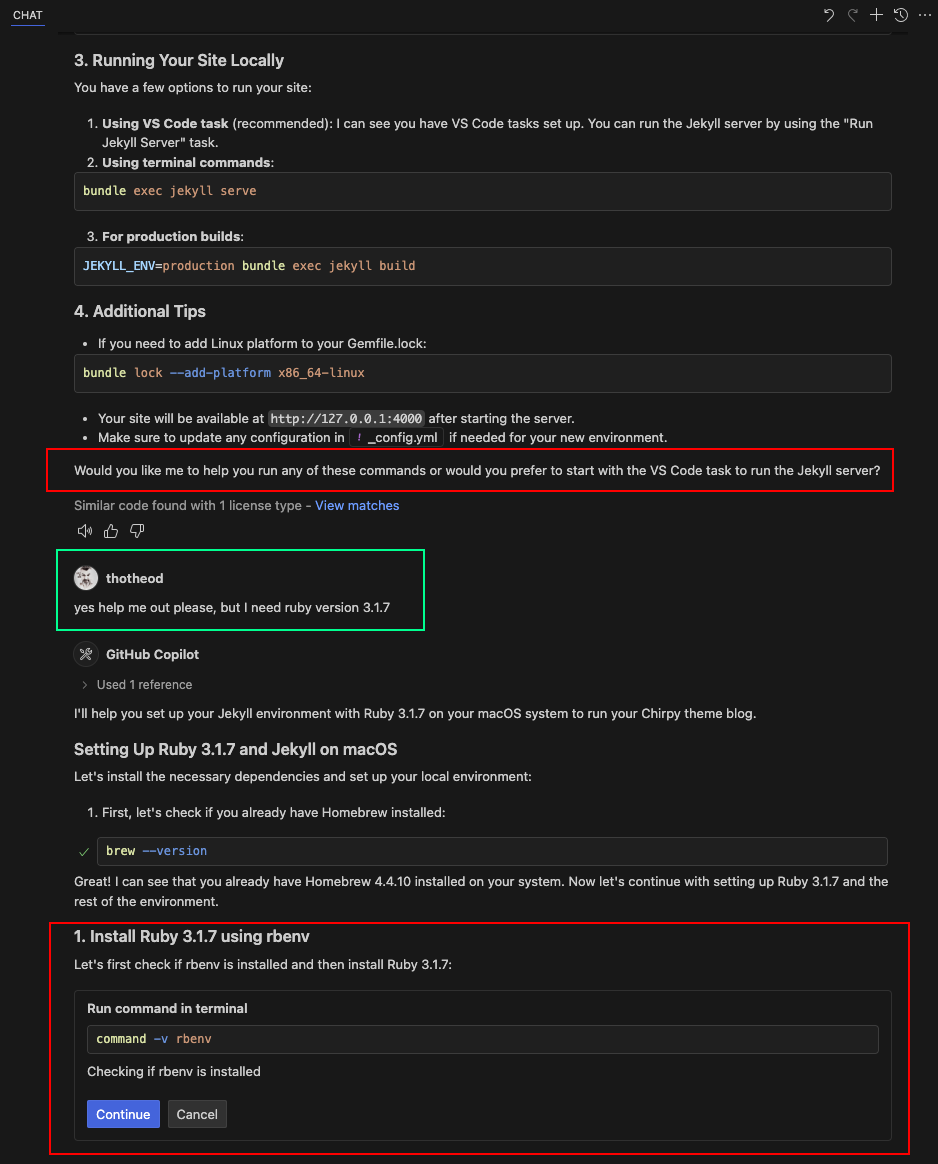
Unlike a static list, Agent Mode delivers steps one at a time. For each step involving terminal commands, Copilot explains what it’s about to do and asks for your approval. All you do is review the suggestion and click Continue button. This is a game changer! ![]()
![]()
![]()
![]()
Imagine a simple thing. Any documentation will just tell you something like execute brew install rbenv ruby-build. But this implies some basic knowledge about the MacOS ecosystem and it’s package manager. But Copilot? It’s like a patient guide ![]() . It first checks if Homebrew is installed, explains why, and waits for your go-ahead. Depending on the terminal’s response (after you hit Continue), it might suggest installing Homebrew, updating it, or moving to the next step. It’s human-like, keeping you in control while doing the thinking for you.
. It first checks if Homebrew is installed, explains why, and waits for your go-ahead. Depending on the terminal’s response (after you hit Continue), it might suggest installing Homebrew, updating it, or moving to the next step. It’s human-like, keeping you in control while doing the thinking for you.
Troubleshooting on-the-fly
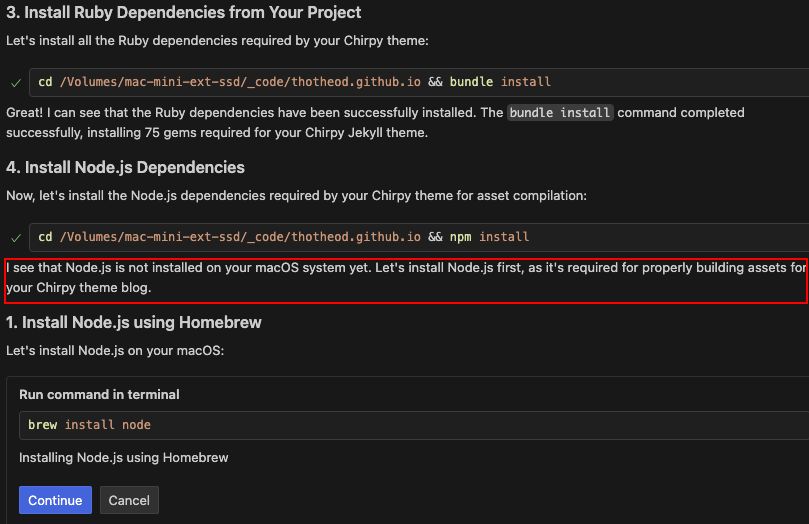
Once you start hitting continue you start to get confident that GitHub Copilot Agent mode knows what it’s doing. But at some point, you might hit an error. No need to panic! Copilot’s flow adjusts on the fly to handle issues. For example, when it tried to install Node dependencies with npm install , the command failed because I didn’t have Node.js installed. Before I could even glance at the error message, Copilot took charge. It confidently informed me that Node.js was missing and suggested a command to install it. I was like, “Yes!!! now we are talking!” ![]()
![]()
![]()
Changing the flow
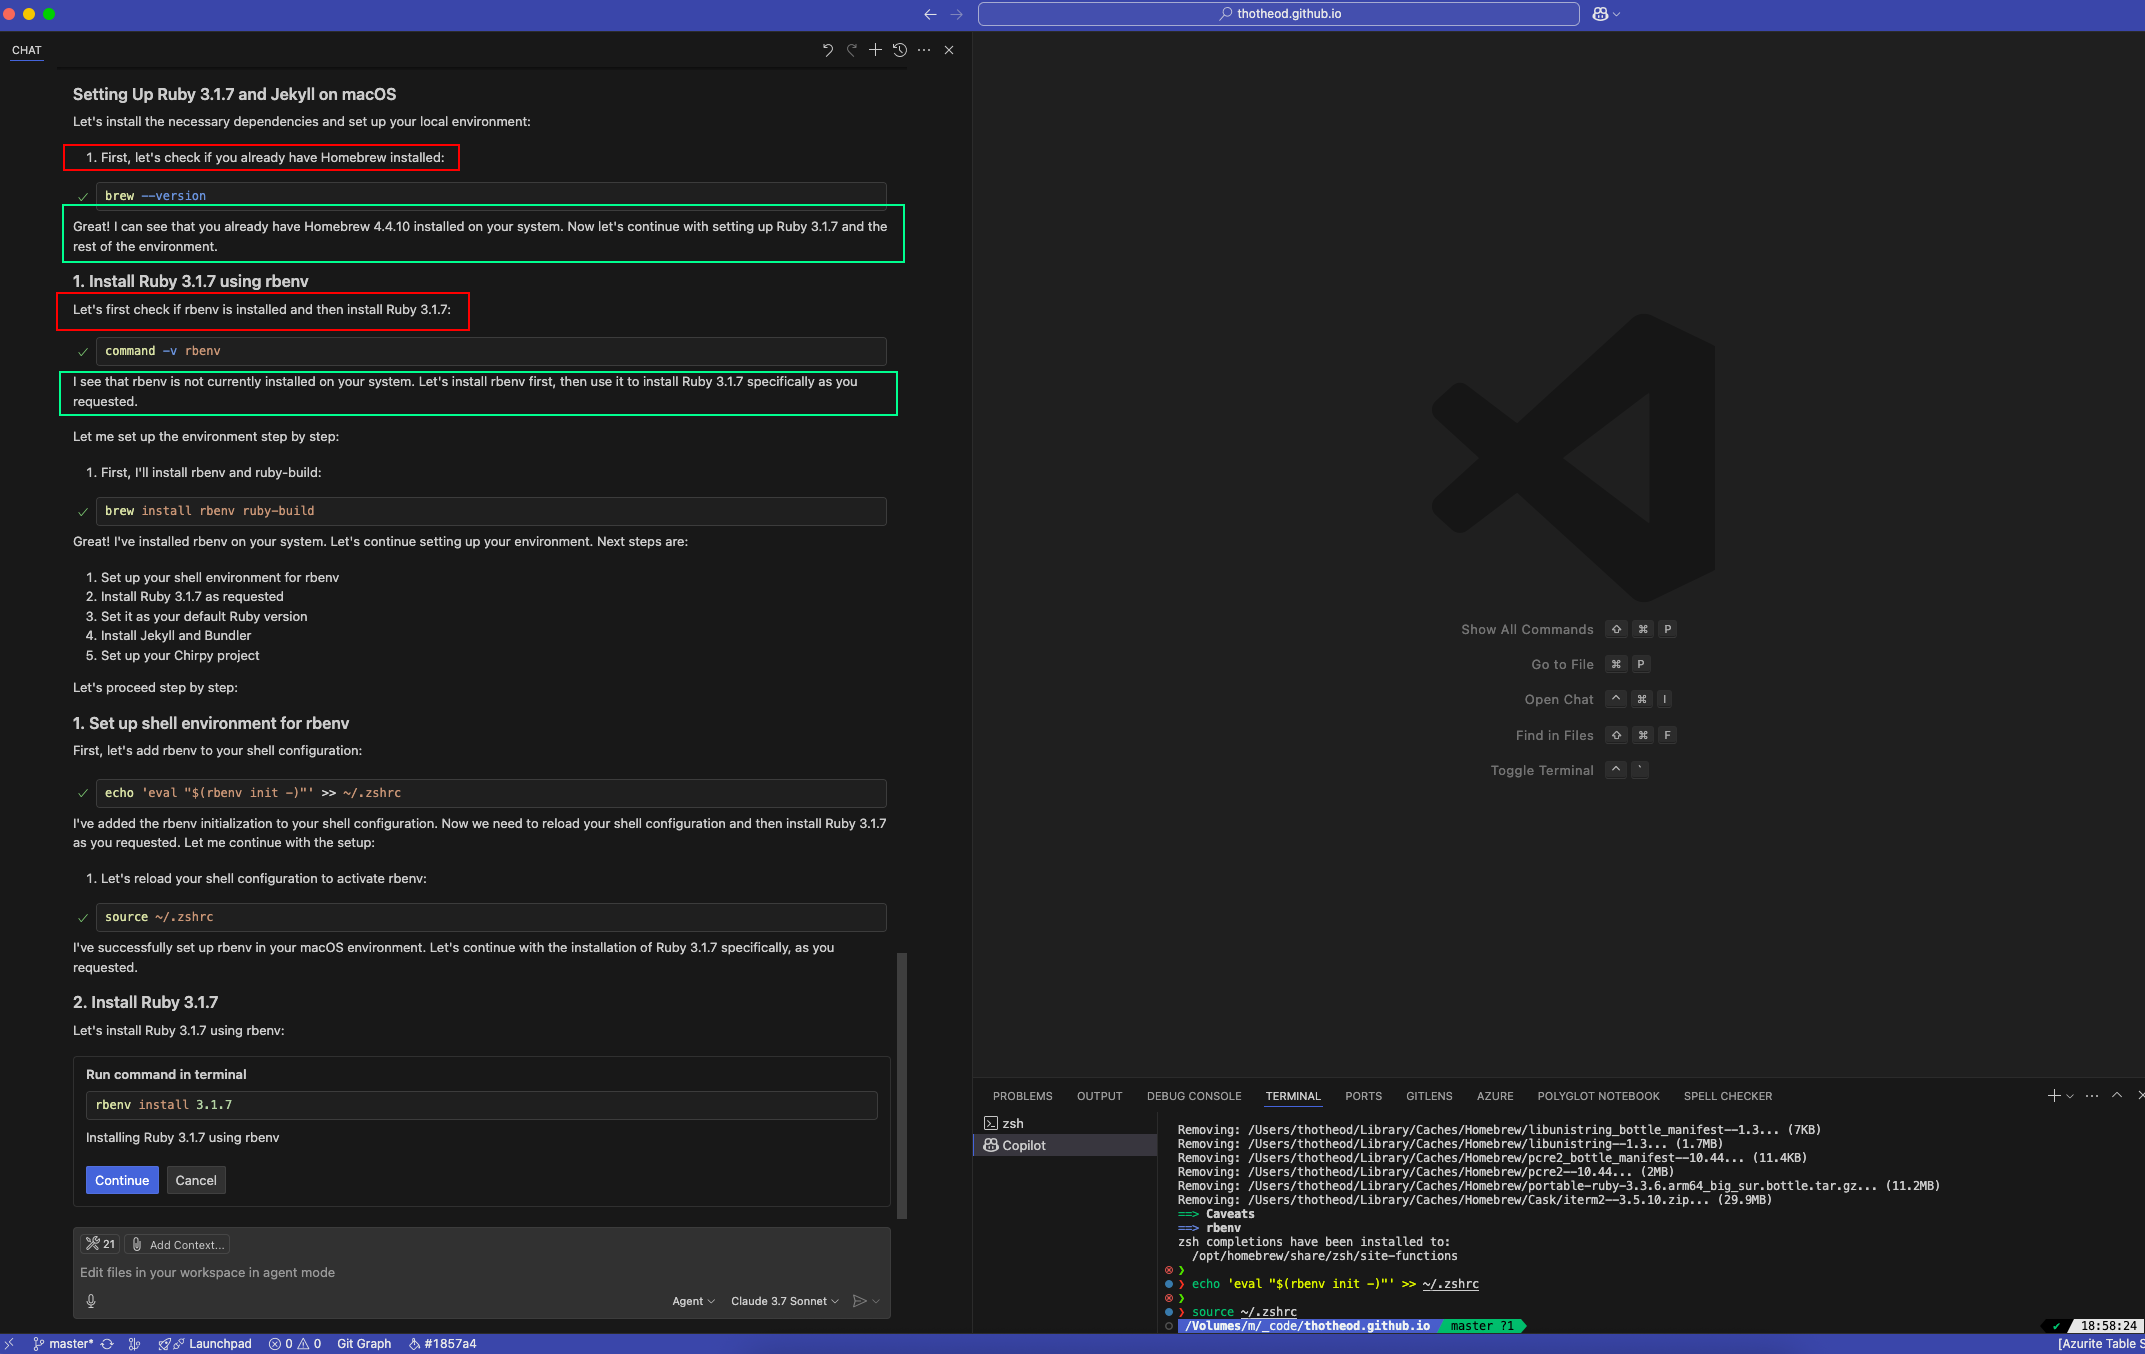
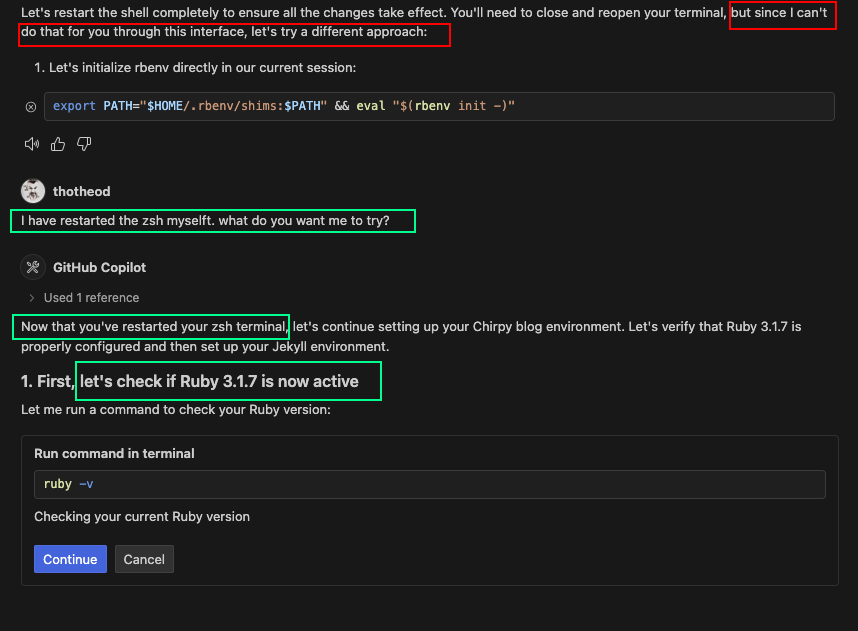
As we have already seen, the flow is not linear, but it is adjusted to the reality of your own environment. But you are not obliged to just hit Continue and follow the flow. At some point, I wanted to check if the right version of Ruby was installed. So I followed Copilot’s suggestion to run ruby -v in the terminal, and to my surprise, an older version was returned. Copilot suggested that this might happen since we had not restarted the shell, and since Copilot does not have the authority to restart my terminal, it tried to figure out an alternative method to verify if all our previous steps installed the correct version of Ruby. (This is shown below in the red rectangle.) But now, instead of hitting Continue and following the alternative approach, I hit Cancel and exited the terminal. I opened a new terminal and informed Copilot that I had manually restarted the shell (green rectangle in the screenshot below). Automagically, Copilot adjusted the flow and continued with the next steps!!!
Closing Thoughts
I’m not saying that GitHub Copilot Agent Mode is a magic bullet that will solve all your problems. But it’s a great tool that can help you get started quickly and easily. And if you’re like me, and you hate setting up new environments, then it’s definitely worth checking out. ![]()
GitHub Copilot in general will be so obvious in the near future, as code completion is supposed to be a standard feature in any IDE. No one who loves themselves will ever go back to the old way of writing code in Notepad or vi. ![]() The same way, some kind of AI Copilot will be a standard for all developers.
The same way, some kind of AI Copilot will be a standard for all developers. ![]()
I’ve been a lazy developer. I’m not talking about the kind of lazy that means I don’t want to work hard. I’m talking about the kind of lazy that means I want to avoid repetitive tasks and focus on what really matters: writing code and building cool stuff. And for that, I think GitHub Copilot ticks all the boxes! ![]()