Create APIs with ASP.NET Core
APIs are the backbone of modern applications. They are used to communicate between different services, applications, and devices. ASP.NET has traditionally been a popular choice for building APIs and for most of its time it was supporting what we call Controller Based APIs. A couple of years ago, with the release of .NET 6 a new way of building APIs was introduced, called Minimal APIs. This new way of building APIs is more lightweight and simpler than the traditional way. In this post we will see how they compare to traditional Controller BAsed APIs and how we can implement them.
Minimal APIs vs Controller Based APIs
Minimal APIs are designed to be simple and lightweight. They are a great choice for small APIs or for APIs that don’t require a lot of configuration. They are built on top of ASP.NET Core and they are designed to be easy to use and understand. They are a great choice for developers who want to get up and running quickly with a new API. Regarding their capabilities, they are not as powerful as Controller Based APIs, but offer many of the same features.
A more detailed comparison between the two can be found here.
In the next steps we will implement the same simple “TODO API” using both approaches. Our sample is based on the tutorials:
Create an API Project
We will be working on Visual Studio Code. We need to have .NET 8 SDK installed in our windows system. To check if you have it already installed, run dotnet --version in your terminal. If you don’t have it installed, you can download it from here or run winget install Microsoft.DotNet.SDK.8 in your terminal.
Once you have the .NET 8 SDK installed, you can create a new ASP.NET Empty project. Then we need to add some nuget packages for InMemory database support etc. Run the following commands in your terminal:
1
2
3
4
5
6
7
8
9
10
11
12
# create a new empty asp.net project
dotnet new web -o TodoApi

# navigate to the project directory
cd TodoApi

# open VSCode
code .

# add the necessary nuget packages for InMemory database support and diagnostics
dotnet add package Microsoft.EntityFrameworkCore.InMemory
dotnet add package Microsoft.AspNetCore.Diagnostics.EntityFrameworkCore
Create Todo model and TodoDB database context
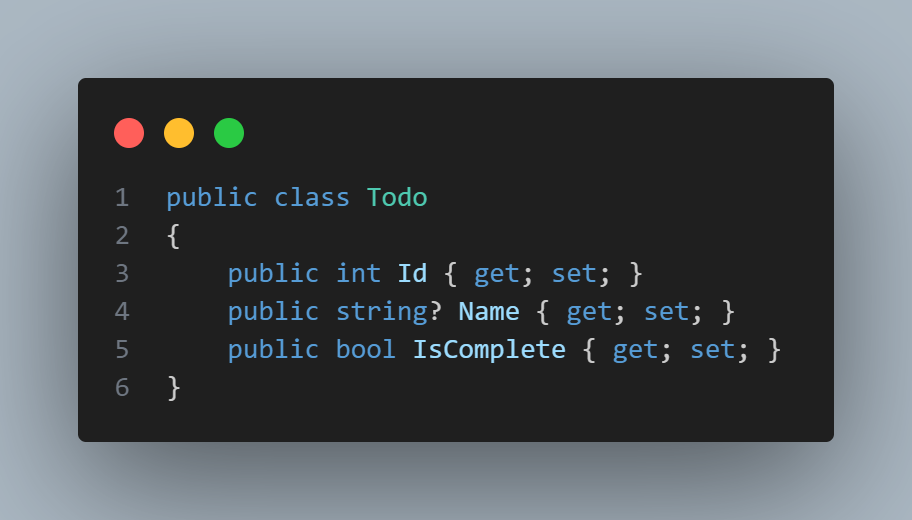
The sample app will be really minimal. We will have a Todo model and a TodoDB database context. The Todo model will have an Id, a Name and a IsComplete property. The TodoDb database context will have a Todos property that will be used to store the Todo objects.
In my sample I create a Models folder and add the Todo.cs model class in it. Then I create a Data folder and add the TodoDb.cs database context class in it. The code for the two classes is as follows:
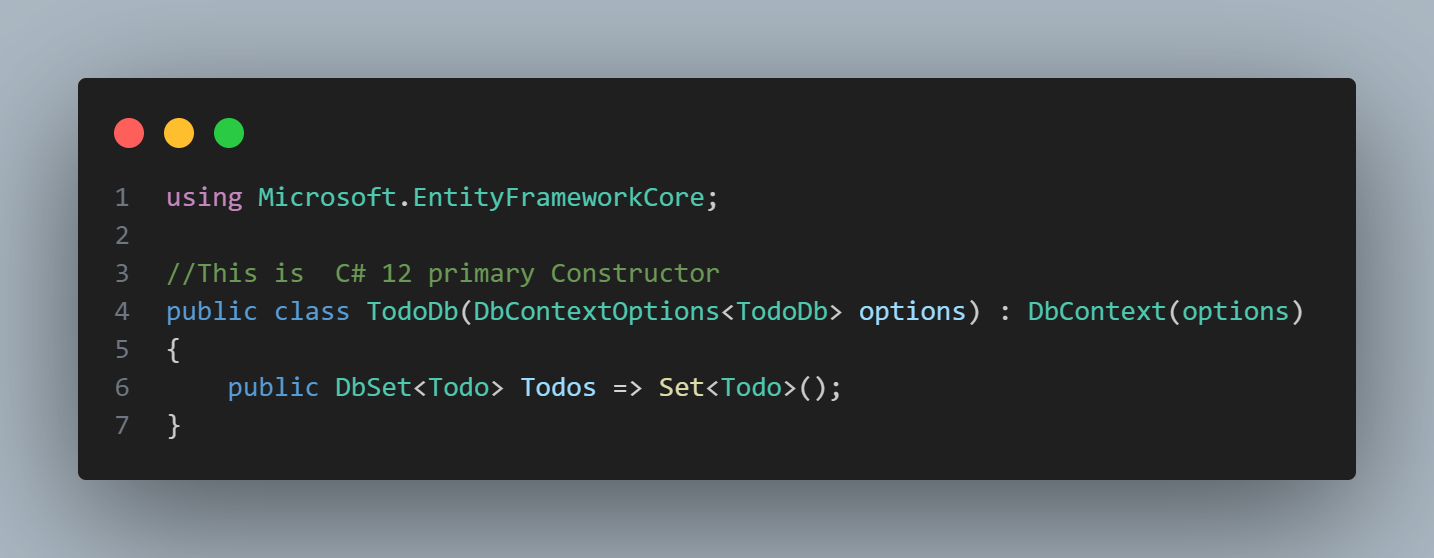
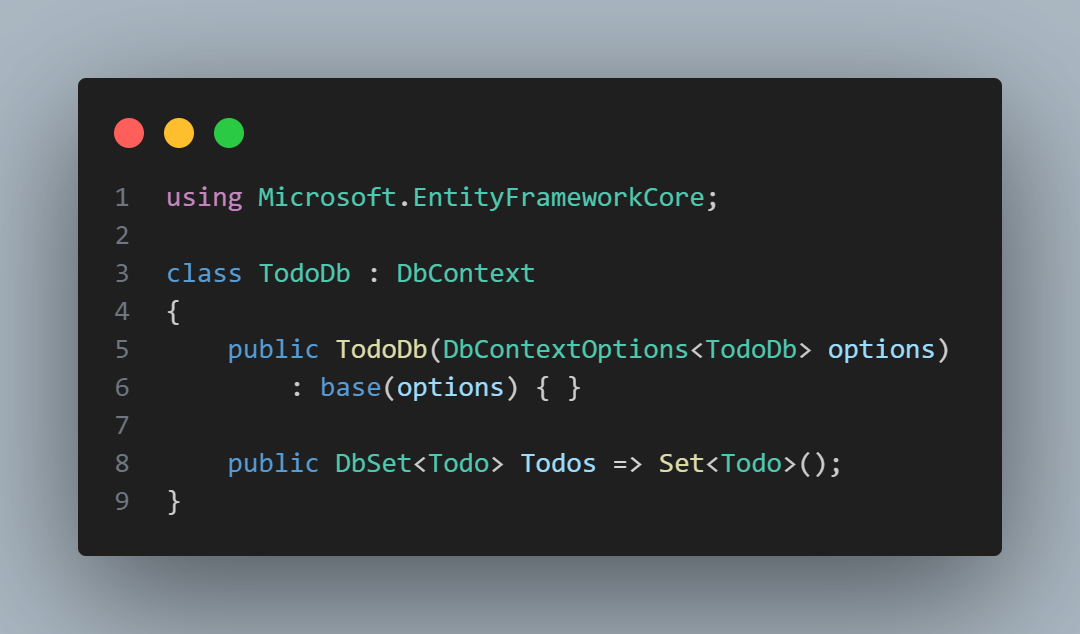
The code above, showcases a new C# 12 feature called Primary Constructors.
The old-fashioned way of defining a constructor in C# was to define a method with the same name as the class whereas with Primary Constructors, you can define the constructor directly in the class definition. For reference, the snippet below shows the old way of defining the same constructor in C#:
Once you have created the Model classes and the DBContext, you need to add in Program.cs DBContext services, as shown below:
1
2
3
4
5
6
7
8
9
10
11
// add a reference to EntityFrameworkCore
using Microsoft.EntityFrameworkCore;

// create the builder
var builder = WebApplication.CreateBuilder(args);

// add the DBContext services
builder.Services.AddDbContext<TodoDb>(opt => opt.UseInMemoryDatabase("TodoList"));
builder.Services.AddDatabaseDeveloperPageExceptionFilter();
//....
//....
Now let’s see in the next two sections how we can implement the same sample TODO Rest API using Minimal APIs and Controller Based APIs.
Controller Based APIs
To scaffold a new API controller we need to add some packages to our project nd update the dotnet-aspnet-codegenerator tool. The scripts below will help you with that:
1
2
3
4
5
6
7
8
9
10
dotnet add package Microsoft.VisualStudio.Web.CodeGeneration.Design
dotnet add package Microsoft.EntityFrameworkCore.Design
dotnet add package Microsoft.EntityFrameworkCore.SqlServer
dotnet add package Microsoft.EntityFrameworkCore.Tools
dotnet tool uninstall -g dotnet-aspnet-codegenerator
dotnet tool install -g dotnet-aspnet-codegenerator
dotnet tool update -g dotnet-aspnet-codegenerator

# scaffold a new controller: flags:
dotnet aspnet-codegenerator controller -name TodoController -async -api -m Todo -dc TodoDb -outDir Controllers
The flags in the above script are explained below:
- -name: Specifies the name of the controller that will be generated. In this case, it’s TodoController.
- -async: Indicates that the actions in the controller will be generated with asynchronous action signatures. This is generally recommended for web APIs to avoid blocking the thread while waiting for I/O operations.
- -api: Indicates that an API controller, rather than a view controller, should be generated. API controllers don’t return views, they return data.
- -m: Specifies the model class to be used. In this case, it’s Todo.
- -dc: Specifies the DbContext class to be used. In this case, it’s TodoDb.
- -outDir: Specifies the directory where the generated controller file will be placed. In this case, it’s the Controllers directory.
After running the above script, you will have a new TodoController.cs file in the Controllers folder. The file will contain the following code:
1
2
3
4
5
6
7
8
9
10
11
12
13
14
15
16
17
18
19
20
21
22
23
24
25
26
27
28
29
30
31
32
33
34
35
36
37
38
39
40
41
42
43
44
45
46
47
48
49
50
51
52
53
54
55
56
57
58
59
60
61
62
63
64
65
66
67
68
69
70
71
72
73
74
75
76
77
78
79
80
81
82
83
84
85
86
87
88
89
90
91
92
93
94
95
96
97
98
99
100
101
102
using System;
using System.Collections.Generic;
using System.Linq;
using System.Threading.Tasks;
using Microsoft.AspNetCore.Http;
using Microsoft.AspNetCore.Mvc;
using Microsoft.EntityFrameworkCore;

namespace TodoApi.Controllers
{
    [Route("api/[controller]")]
    [ApiController]
    public class TodoController(TodoDb context) : ControllerBase
    {
        private readonly TodoDb _context = context;

        // GET: api/Todo
        [HttpGet]
        public async Task<ActionResult<IEnumerable<Todo>>> GetTodos()
        {
            return await _context.Todos.ToListAsync();
        }

        // GET: api/Todo/5
        [HttpGet("{id}")]
        public async Task<ActionResult<Todo>> GetTodo(int id)
        {
            var todo = await _context.Todos.FindAsync(id);

            if (todo == null)
            {
                return NotFound();
            }

            return todo;
        }

        // PUT: api/Todo/5
        // To protect from overposting attacks, see https://go.microsoft.com/fwlink/?linkid=2123754
        [HttpPut("{id}")]
        public async Task<IActionResult> PutTodo(int id, Todo todo)
        {
            if (id != todo.Id)
            {
                return BadRequest();
            }

            _context.Entry(todo).State = EntityState.Modified;

            try
            {
                await _context.SaveChangesAsync();
            }
            catch (DbUpdateConcurrencyException)
            {
                if (!TodoExists(id))
                {
                    return NotFound();
                }
                else
                {
                    throw;
                }
            }

            return NoContent();
        }

        // POST: api/Todo
        // To protect from overposting attacks, see https://go.microsoft.com/fwlink/?linkid=2123754
        [HttpPost]
        public async Task<ActionResult<Todo>> PostTodo(Todo todo)
        {
            _context.Todos.Add(todo);
            await _context.SaveChangesAsync();

            return CreatedAtAction(nameof(PostTodo), new { id = todo.Id }, todo);
        }

        // DELETE: api/Todo/5
        [HttpDelete("{id}")]
        public async Task<IActionResult> DeleteTodo(int id)
        {
            var todo = await _context.Todos.FindAsync(id);
            if (todo == null)
            {
                return NotFound();
            }

            _context.Todos.Remove(todo);
            await _context.SaveChangesAsync();

            return NoContent();
        }

        private bool TodoExists(int id)
        {
            return _context.Todos.Any(e => e.Id == id);
        }
    }
}
Once we run our application, we can test the API using Postman or any other API testing tool. The API will be available at https://localhost:5001/api/Todo. A cool tool to test APIs in VSCode is the Rest Client extension. You can create a new file with the .http extension and write your API requests in it. An example you can find here.
Minimal APIs
The process to scaffold a new minimal API is really simpler. The tutorial provides a step-by-step guide on how to create a new minimal API, but it adds all the required code in the Program.cs file. In our case we will add a new folder named Endpoints and add a new file named TodoEndpoints.cs in it. The code for the file is presented below. One point to note is that we are using the MapGroup method to group all the endpoints under the /min-api/todo route prefix, so that we do not need to repeat the route prefix again and again. We also expose this API to a different URL from the controller based API so that we can have both implementations running side by side at the same time.
1
2
3
4
5
6
7
8
9
10
11
12
13
14
15
16
17
18
19
20
21
22
23
24
25
26
27
28
29
30
31
32
33
34
35
36
37
38
39
40
41
42
43
44
45
46
47
48
49
50
51
52
53
54
55
56
57
58
59
60
61
using Microsoft.EntityFrameworkCore;

public static class TodoEndpoints
{
    public static void MapTodoEndpoints(this IEndpointRouteBuilder routes)
    {
        // we added MapGroup, so we do not need to repeat the route prefix again and again
        var group = routes.MapGroup("/min-api/todo").WithTags(nameof(Todo));

        // get a list of all todos
        group.MapGet("/", async (TodoDb db) =>
           await db.Todos.ToListAsync());

        // get a list of all todos that are complete
        group.MapGet("/complete", async (TodoDb db) =>
            await db.Todos.Where(t => t.IsComplete).ToListAsync());

        //get details of a specific todo by id
        group.MapGet("/{id}", async (int id, TodoDb db) =>
            await db.Todos.FindAsync(id)
                is Todo todo
                    ? Results.Ok(todo)
                    : Results.NotFound());
        // add a new todo
        group.MapPost("/", async (Todo todo, TodoDb db) =>
        {
            db.Todos.Add(todo);
            await db.SaveChangesAsync();

            return Results.Created($"/{todo.Id}", todo);
        });

        // update a todo
        group.MapPut("/{id}", async (int id, Todo inputTodo, TodoDb db) =>
        {
            var todo = await db.Todos.FindAsync(id);

            if (todo is null) return Results.NotFound();

            todo.Name = inputTodo.Name;
            todo.IsComplete = inputTodo.IsComplete;

            await db.SaveChangesAsync();

            return Results.NoContent();
        });

        // delete a todo item by id
        group.MapDelete("/{id}", async (int id, TodoDb db) =>
        {
            if (await db.Todos.FindAsync(id) is Todo todo)
            {
                db.Todos.Remove(todo);
                await db.SaveChangesAsync();
                return Results.NoContent();
            }

            return Results.NotFound();
        });
    }
}
The only thing we need to to do now is to add the MapTodoEndpoints method to the Program.cs file (before the app.Run()).
Add Swagger support
First we need to add the necessary nuget package by running dotnet add package NSwag.AspNetCore. Then we need to add the following code in the Program.cs file:
1
2
3
4
5
6
7
8
9
10
11
12
13
14
15
16
17
18
19
20
21
22
23
24
25
26
27
28
29
using NSwag.AspNetCore;
// ...
// ...
// ...

//add before builder.Build();
builder.Services.AddEndpointsApiExplorer();
builder.Services.AddOpenApiDocument(config =>
{
    config.DocumentName = "TodoAPI";
    config.Title = "TodoAPI v1";
    config.Version = "v1";
});

// ....
// ...

// add before app.Run();
if (app.Environment.IsDevelopment())
{
    app.UseOpenApi();
    app.UseSwaggerUi(config =>
    {
        config.DocumentTitle = "TodoAPI";
        config.Path = "/swagger";
        config.DocumentPath = "/swagger/{documentName}/swagger.json";
        config.DocExpansion = "list";
    });
}
Final Thoughts
The sample APIs we created are really simple and minimal. They are a great starting point for anyone who wants to learn how to build APIs with ASP.NET. The Minimal APIs are a great choice for small APIs or for APIs that don’t require a lot of configuration. They are simple and lightweight and they are a great choice for developers who want to get up and running quickly with a new API. The Controller Based APIs are more powerful and offer more features, but they are also more complex and require more configuration. Both approaches have their pros and cons and the choice between them will depend on the specific requirements of your project. The Sample API project is available on GitHub.