Launch your blog for free with Jekyll and GitHub Pages
I’ve never been much of a blogger. I didn’t use to share my experiences, knowledge, or questions on forums or other social platforms. However, there were times when I found myself doing something, which could be either fairly complex or even quite simple but new to me. In such moments, I felt the need to document it, so I could easily replicate the process in the near future. You see, I tend to forget things rather quickly, so documenting my findings became essential. The big question was, where should I document them? I never had a structured approach for this. After experimenting with various options, I became enamored with Markdown. I truly appreciated its simplicity, flexibility, and the power it offered. But the issue of where to store these Markdown documents remained unsolved. It could be in local Git repositories, GitHub Repositories, GitHub Gists, plain files, and so on.
I had definitely toyed with the idea of starting a blog at one point, but I wasn’t keen on “investing” in the common blogging platforms with their full-fledged CMS. I was aware of Github Pages, and I knew how to work with Markdown, but it was only when I stumbled upon Thomas Stringer that put everything together ![]() .
.
TL:DR - What I need to get started
I will start by adding some links and basic tips in this paragraph for those that just want to get started quickly.
-
jekyll: If you love markdown, and want to avoid html/css/javascript as much as possible, or CMS with databases etc, then Jekyll is all you need. This is THE best static site generator (my blog - my opinion
 )
)
- Linux Machine or Windows with WSL. Jekyll works on windows as well, but is not officially supported.
- GitHub Account to host/use GitHub Pages
- Chirpy Jekyll theme
 Chirpy Theme Avatar
How I create this blog - Detailed Steps
Setup local machine
I am using a Windows 11 with WSL (running ubuntu 22.00). We need to setup our local machine, so we can author posts, render and test our site (blog) locally; it is really helpful. To do tht we follow the official instructions for ubuntu
If we need to verify that everything is working as expected (and if you are curious to have a first taste of how Jekyll is working) do the following steps in your ubuntu shell:
1
2
3
4
5
6
7
8

# create default jekyll site
jekyll new test-jekyll

# get into the new folder
cd test-jekyll

# run locally
bundle exec jekyll serve
Now open the browser and head to http://localhost:4000. If you see something similar to the below image, you are all set!
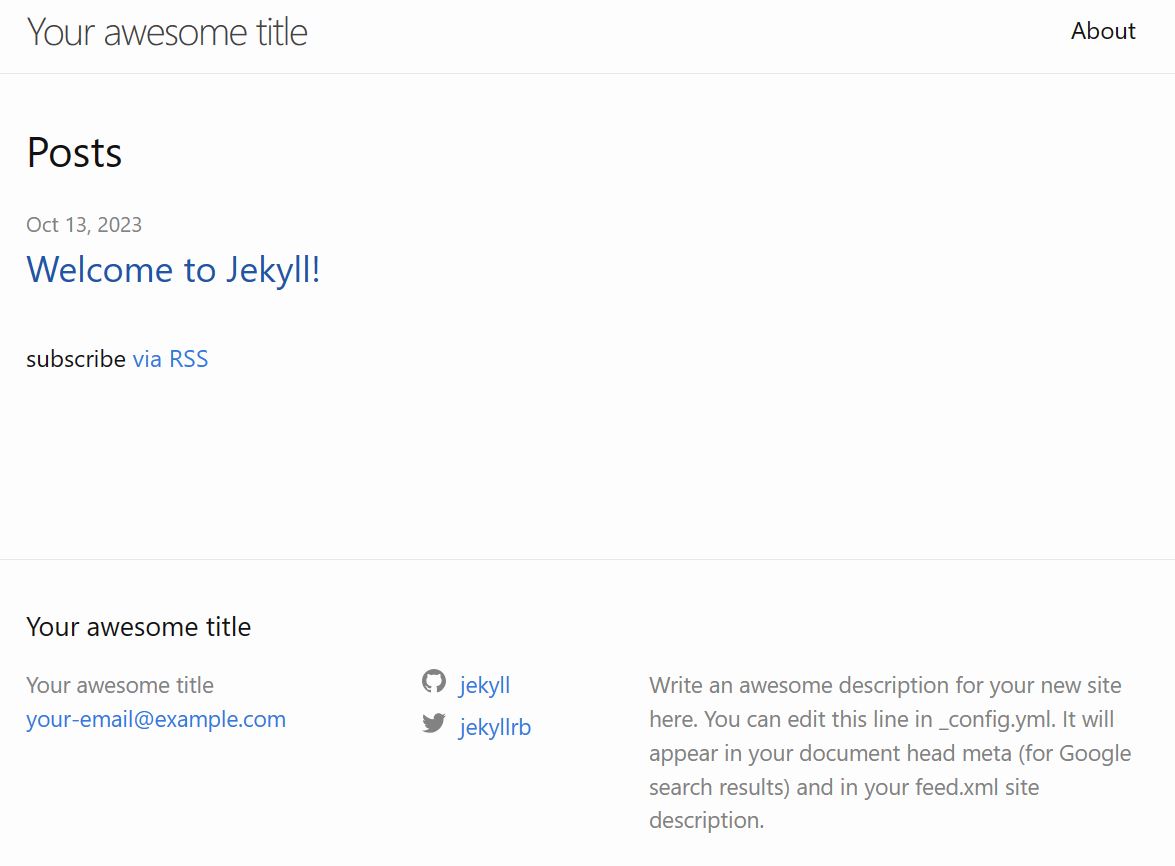 Default, empty Jekyll site
Use Chirpy repo and theme
Jekyll is powerful, but the starting theme you get out-of-the-box is really limited, as you have seen above. You can of course use Jekyll Themes and you can of course heavily customize your blog. But you can just focus on what you have to say, and start with a heavily customized and opinionated theme, suitable for technical blogs. Enter Chirpy ![]() ! ! ! !
! ! ! !
Anything documented here is tested for release 6.2.3
Setting up Chirpy
There are a couple of ways to start with the Chirpy theme, but I personally selected to fork their original repo, and do any customization in my own copy, as required.
Sign in to your GitHub account to fork the Chirpy repo, and rename it to USERNAME.github.io (USERNAME is your GitHub handle, in my case this is thotheod)
Make sure the Build and deployment pipelines are correct:
- Go to the Settings of you repo and under Code and Automation click on Pages (i.e. https://github.com/USERNAME/USERNAME.github.io/settings/pages). Make sure that GitHub Actions is selected for Build And Deployment > Source
- Go to Actions and if asked, enable the GitHub Actions names Build and Deploy
Next open a Linux shell to clone the repo and start the initial configuration / build
1
2
3
4
5
6
7
8
9
10
11
12
13
14
15
16
17
18
19
20

# go to a folder where you will store the blog's repository (change USERNAME to your github account handle)
git clone https://github.com/USERNAME/USERNAME.github.io.git

# go to the correct folder, after cloning the repo
cd USERNAME.github.io

# install nodejs if not present yet
sudo apt-get install Node.js

# check version is greater than v12.22.9
node -v

# instal npm if not present
sudo apt-get install npm

# run the initialization
bash tools/init

# Before running local server for the first time, go to the root directory of your site and run:
bundle
In my case the process above, failed to serve the site, because there were no files in
assets/js/dist/. To solve that issue I have done the following:
- Edit
.gitignoreand remove theassets/js/dist(you can comment out with #)- Create the folder missing (
assets/js/dist/), and copy the required files fromhttps://github.com/cotes2020/chirpy-demo/tree/main/assets/js/dist
If everything set correctly, commit your files/changes and push to the blog’s repo. The action should run successfully (it should take around a minute) and then you could see your site live.
To test it locally you can use bundle exec jekyll serve or bash tools/run
Basic Customization
The first things you need to configure are found in the file _config.yml. Most of the file has comments with thorough explanation. Here you need to configure things like
- theme style (dark or light)
- name of the author (your name :) )
- contact information / social network identifiers
- number of articles per page etc
Posting new messages
There is a folder named _posts. In that folder we store all our new markdown posts. There is some convention that we need to follow. The file names need to follow that format: YEAR-MONTH-DAY-title.markdown.
Every post, has a front matter. This is used to set several things, like tags, categories but also the date of the post. The date used in the front matter is the one used as publishing date.
If you need to store a post that is is still “in progress” you can create a folder called _drafts and store it there. Once finalized, change it’s name to follow the aforementioned convention and move it to the _posts folder
Typography / Styling Tips
Override color variables
In the folder _sass/colors there are several files for defining basic properties and variables per color scheme. We have:
-
syntax-dark.scssandsyntax-light.scss: These files define variables and properties for the code snippets based on the selected color scheme (dark or light) -
-
typography-dark.scssandtypography-light.scss: These files define variables and properties for the whole site based on the selected color scheme (dark or light)
-
Inside those files there are several mixins which define CSS custom properties - variables for defining things like background colors etc.
If we spot a specific variable, and we need to change it’s value, we should avoid doing that on those files directly. What we can do instead, is to write our overrides in the file assets/css/jekyll-theme-chirpy.scss. In order to override a specific variable (i.e. let say we need to make the –main-bg property equal to green), irrespectively of the selected color scheme we do the following/
1
2
3
4
5
6
7
8
9
10

/* (we add our values after the existing comment below) */
/* append your custom style below */

:root[data-mode] {
  --main-bg: green;
}

:root[data-mode="light"] {
  --main-bg: green;
}
However, if we need to turn the specific value to
- red, if the light scheme is selected
- green if the dark scheme is selected
- yellow if no scheme is selected, we can do the following:
1
2
3
4
5
6
7
8
9
10
11
12
13
14

/* (we add our values after the existing comment below) */
/* append your custom style below */

:root[data-mode="light"] {
  --main-bg: red;
}

:root[data-mode="light"] {
  --main-bg: green;
}

:root:not([data-mode]) {
  --main-bg: yellow;
}
In order to be sure that we are using the higher priority selector (and we surely override all the values) we use the :root pseudo-class that represents the highest-level parent element in the document tree, which is typically the <html> element.
Override CSS default behavior
You have the flexibility to customize the default CSS behavior by utilizing the /_sass/main.scss file. This file serves as the central point for importing all individual scss files, allowing you to introduce your own CSS modifications. As an example, with Chirpy, you can tailor the appearance of several elements that appear at the end of each blog post. These elements include the blog post’s category, tags, licensing information, and social sharing links.
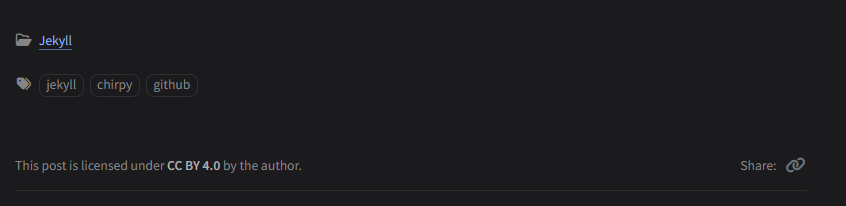 Default Blog Post ‘includes’
In my case I do not want the categories and the license related message to show up at the end of every blog post, so with the snippet below I hide out.
1
2
3
4
5
6
7
8
9
10
11
12
13
14

... ... @import "layout/categories";
@import "layout/category-tag";

//TODO: add css here to over-write the default css

// hide categories from the blog post end
.post-meta.mb-3 {
  display: none;
}

// hide the license from the blog post end
.license-wrapper {
  display: none;
}
Code Snippets
While I love Dark Themes, I think reading a really dark blog page could be cumbersome and tiring for the majority of people. Thus I selected to customize the light theme. However, I really love dark backgrounds when I read code. So I wanted to keep my light theme, but borrow the dark theme for the code snippets. To do so, I customized the _sass/addon/syntax.scss file, to always select the dark-syntax mixin; regardless of the initial/global color scheme preference. Possibly not the most optimal solution (since it can break sync to the main repo) but certainly an easy one to start with.
Check below the dark themed code snippets
1
2
3
4
5

// Javascript code with syntax highlighting.
var fun = function lang(l) {
  dateformat.i18n = require("./lang/" + l);
  return true;
};
1
2
3
4

# Ruby code with syntax highlighting
GitHubPages::Dependencies.gems.each do |gem, version|
  s.add_dependency(gem, "= #{version}")
end
However if we need to override the background value of the inline code snippets (because we do not like to see black backgrounds inline) then we do the following in the file assets/css/jekyll-theme-chirpy.scss
1
2
3
4

:root[data-mode] {
  --inline-code-bg: #dad2d2d2; // inline code background color
  --highlighter-rouge-color: #0e0f30; // inline code text color
}
Use GitHub emojis
By default github emojis will not show up in your posts. We need a plugin for that, named jemoji. To use this plugin do the following:
1
2
3
4
5
6
7

# Add the following to your site's Gemfile
gem 'jemoji'

# And add the following to your site's _config.yml
plugins:
  - jemoji
Prompts
Example showing the prompt-tip
1
2

> Example showing the prompt-tip
{: .prompt-tip }
Example showing the prompt-info
1
2

> example showing the prompt-info
{: .prompt-info }
Example showing the prompt-warning
1
2

> Example showing the prompt-warning
{: .prompt-warning }
Example showing the prompt-danger
1
2

> Example showing the prompt-danger
{: .prompt-danger }
Useful commands
Below I am gathering some of the basics commands I use to test or build my blog.
1
2
3
4
5
6
7
8
9
10
11
12
13
14
15
16
17
18
19
20
21
22

# To run locally the site you need the following command
bundle exec jekyll serve

# If you wish to include drafts, or posts with future date, you can use the following alternative
bundle exec jekyll serve --drafts --future

# If you haven't made any "cosmetics" changes, and made changes just in the posts, you can use --incremental flag
bundle exec jekyll serve --drafts --future --incremental

# if you have cloned from Chirpy repo you can use the following to run local
bash tools/run

# build your site locally
bundle exec jekyll b

# test your site for broken links, missing artifacts etc....
bundle exec htmlproofer _site \
            --disable-external=true \
            --ignore-urls "/^http://127.0.0.1/,/^http://0.0.0.0/,/^http://localhost/"

# if you have cloned from Chirpy repo you can use the following to build locally
JEKYLL_ENV=production bundle exec jekyll b